Tooth Fairy Pillow DIY Tutorial: Step-by-Step Guide
Learn to make adorable tooth fairy pillows with our complete DIY tutorial. No-sew, hand-sewing, and machine options for every skill level. Free patterns include
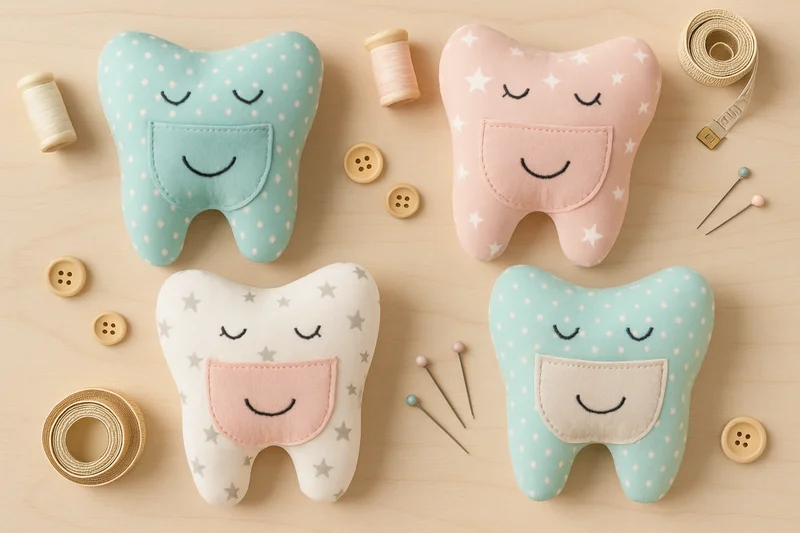
Tooth Fairy Pillow DIY Tutorial: Complete Step-by-Step Guide with Free Patterns
Your child's first loose tooth brings excitement, but it also brings a practical problem: how do you ensure the tooth fairy can find that tiny tooth without waking a sleeping child? The solution that countless parents have discovered is the tooth fairy pillow—a special cushion designed specifically for this magical exchange.
Unlike searching under regular pillows in the dark, tooth fairy pillows provide a secure pocket for the tooth and make the fairy's job significantly easier. Whether you're a complete beginner who's never touched a sewing machine or an experienced crafter looking for a quick project, this comprehensive guide covers multiple approaches to create your own tooth fairy pillow.
While you're crafting the perfect pillow, imagine pairing it with a personalized letter that acknowledges your child's specific tooth loss and celebrates their bravery. The Magic Letter Box creates unlimited custom letters for every childhood milestone—from tooth fairy visits to birthdays, school achievements to holiday magic. A handmade pillow becomes even more special when accompanied by a letter that mentions your child by name and celebrates their unique journey.
Why Choose a DIY Tooth Fairy Pillow?
Store-bought tooth fairy pillows can cost anywhere from $15 to $40, but creating your own offers several advantages beyond cost savings. Handmade pillows can be customized to match your child's interests, favorite colors, and personality. You control the materials, ensuring they're safe and high-quality, and the process itself can become a bonding activity if your child is old enough to help.
Additionally, understanding the construction means you can repair or modify the pillow as needed, and you'll have the skills to make additional pillows for siblings or friends. The sense of accomplishment from creating something functional and meaningful adds value that goes beyond the monetary investment.
Before starting any craft project with children, review basic safety guidelines. KinderArt's safety guide for children's crafts emphasizes the importance of age-appropriate materials and proper supervision when working with scissors, needles, and other crafting tools.

Essential Materials and Safety Considerations
The specific materials you'll need depend on which tutorial you follow, but several items are universal across all approaches. Understanding these basics helps you make informed decisions about your project.
Fabric Selection
Cotton fabrics work well for beginners because they're easy to handle and widely available. Felt offers advantages for hand-sewing projects since it doesn't fray and provides structure. Avoid stretchy materials like jersey or knit fabrics, which can be challenging for beginners to work with accurately.
Consider washability when selecting fabrics, as tooth fairy pillows will likely need cleaning over time. Pre-wash fabrics before cutting to prevent shrinkage after the pillow is complete.
Thread and Notions
Choose thread that matches your fabric color for a polished appearance. If you're hand-sewing, embroidery floss provides durability and is easier for children to work with than standard sewing thread. Expert recommendations for sewing with children suggest using larger needles with bigger eyes when working with young crafters.
Safety Considerations for Family Crafting
If you're including children in the crafting process, safety becomes paramount. Industry safety guidelines for teaching children to sew recommend starting with hand-sewing before introducing machine sewing, using child-appropriate scissors, and maintaining close supervision throughout the process.
Sharp needles are necessary for clean stitching, but teach children to handle them respectfully. Establish clear rules about needle placement and storage, and consider using magnetic pin cushions to prevent lost needles.
Method 1: No-Sew Tooth Fairy Pillow
This approach requires no sewing skills and can be completed in about 30 minutes. It's particularly suitable for last-minute projects or when working with very young children who want to help create their own pillow.
Materials Needed:
- Two 6x6 inch pieces of felt (white or your preferred color)
- One 4x3 inch piece of contrasting felt for pocket
- Fabric glue suitable for felt
- Scissors
- Black permanent marker or fabric paint
- Polyester stuffing
- 12 inches of ribbon (optional, for hanging)
- Decorative elements (buttons, sequins, etc.)
Step-by-Step Instructions:
Step 1: Create your tooth shape by drawing it on paper first, or print a free template. The basic shape should be roughly 5 inches tall and 4 inches wide at the top, tapering toward the bottom like an actual tooth.
Step 2: Cut two identical tooth shapes from your main felt color. If you're including a hanging loop, cut your ribbon now and set it aside.
Step 3: Create the pocket by cutting a rounded rectangle from your contrasting felt. The pocket should be about 3 inches wide and 2 inches tall.
Step 4: Position the pocket on what will be the back of your pillow (one of your tooth shapes). Apply fabric glue along the bottom and sides of the pocket, leaving the top open. Press firmly and allow to set according to glue instructions.
Step 5: If adding a face, use your marker or fabric paint to create simple eyes and a smile on the front piece. Keep the design simple and allow paint to dry completely before proceeding.
Step 6: Apply fabric glue around the edges of one tooth piece, leaving a 2-inch opening at one side for stuffing. If including a hanging ribbon, insert it between the layers at the top before pressing the pieces together.
Step 7: Once the glue has set, carefully stuff the pillow through the opening. Don't overstuff—the pillow should be soft and flexible.
Step 8: Apply glue to close the opening and press firmly until set. Allow the entire pillow to cure for the time specified by your fabric glue manufacturer before use.
Create Personalized Letters to Pair with Your Handmade PillowThe no-sew method works well for quick projects, but the durability depends entirely on your fabric glue. For pillows that will see regular use, consider the basic sewing method for stronger construction.
Method 2: Basic Hand-Sewing Pattern
Hand-sewing provides more durability than the no-sew method while still being accessible to beginners. This approach teaches basic stitching skills and creates a pillow that can withstand regular use and washing.
Materials Needed:
- Two 7x7 inch squares of cotton fabric
- One 4x4 inch square of felt for pocket
- Thread in coordinating colors
- Hand-sewing needles
- Scissors
- Pins
- Polyester stuffing
- Ruler or measuring tape
- Fabric marker or chalk
Creating the Basic Square Design:
Step 1: Cut your fabric squares accurately. Precise cutting makes the sewing process much easier and results in a more professional-looking finished product.
Step 2: Create the tooth-shaped pocket by drawing a simple tooth outline on your felt square. Cut out this shape, making it approximately 3 inches tall and 2.5 inches wide.
Step 3: Position the felt tooth on one of your fabric squares (this will be the front of the pillow). Pin it in place, ensuring it's centered and positioned where you want the pocket to be.
Step 4: Using a running stitch or backstitch, sew around the tooth shape, leaving the top edge open to create the pocket. Secure your stitches at the beginning and end with small knots.
Step 5: Place the two fabric squares together, right sides facing each other. The side with the pocket should be face-down against the plain square.
Step 6: Pin the layers together and sew around three and a half sides using a backstitch or running stitch, leaving about a 3-inch opening for turning and stuffing.
Step 7: Carefully turn the pillow right-side out through the opening. Use a blunt tool like a knitting needle to gently push out the corners.
Step 8: Stuff the pillow to your desired firmness. The stuffing should fill the pillow but allow it to remain flexible enough for comfortable use.
Step 9: Close the opening using a ladder stitch (invisible stitch) to create a clean finish.
Hand-sewing teaches valuable skills and creates a strong connection between crafter and project. For children learning to sew, this method provides practice with fundamental techniques. For more comprehensive guidance on DIY tooth fairy gifts, explore our collection of creative tooth fairy ideas that complement handmade pillows.
Method 3: Machine-Sewing for Efficiency
Machine sewing offers speed, consistency, and professional-looking seams. This method is ideal when you need to make multiple pillows or want the most durable construction possible.
Additional Materials for Machine Sewing:
- Sewing machine
- Machine needles appropriate for your fabric weight
- Seam ripper (for correcting mistakes)
- Iron and ironing board
- Pinking shears (optional, for finishing seams)
Machine-Sewing Process:
Step 1: Prepare your fabric pieces as in the hand-sewing method, but consider using pinking shears to cut your main fabric pieces to prevent fraying.
Step 2: Attach the pocket piece using your sewing machine's straight stitch. Backstitch at the beginning and end to secure seams.
Step 3: Pin the main pieces together with right sides facing and sew a 1/4-inch seam around the perimeter, leaving a 3-4 inch opening for turning.
Step 4: Trim corners at an angle to reduce bulk, being careful not to cut through your stitching line.
Step 5: Turn the pillow right side out and press with an iron for crisp edges.
Step 6: Stuff the pillow and hand-stitch the opening closed, or use your machine to topstitch the entire pillow perimeter for a more finished look.
Speaking of finishing touches, our free tooth fairy letter generator creates personalized letters that make any handmade gift feel extra special. Mention your child's specific tooth, their bravery during the process, or how proud the tooth fairy is of their growing smile.

Advanced Designs and Customization Options
Once you've mastered the basic techniques, numerous customization possibilities open up. These advanced options allow you to create truly unique pillows that reflect your child's personality and interests.
Character-Themed Designs
Transform your basic tooth design into characters that match your child's interests. A superhero tooth might include a felt cape and mask, while a princess tooth could feature a crown and sparkly details. Pirate themes work well with felt eye patches and bandanas.
Consider your child's current favorites when choosing a theme. The pillow will likely be used multiple times as different teeth fall out, so select themes with lasting appeal rather than fleeting trends.
Embroidery and Decorative Stitching
Hand embroidery adds personality and charm to tooth fairy pillows. Simple embroidery stitches like backstitch, French knots, and blanket stitch can create faces, decorative borders, and textural interest.
If using an embroidery machine, digitized designs specifically created for tooth fairy themes are available from various sources. Keep designs proportional to your pillow size to maintain visual balance.
Appliqué Techniques
Fabric appliqué allows you to add complex shapes and details without advanced embroidery skills. Layer different fabrics to create wings, clothing, accessories, or background elements.
When planning appliqué designs, consider the order of application. Background elements should be applied first, with detail pieces layered on top. Use fusible interfacing for crisp edges and easier application.
Interactive Elements
Consider adding elements that engage your child beyond the basic pocket function. Buttons that represent different teeth, small attached toys, or hidden pockets for special messages can extend the pillow's play value.
Ensure any small elements are securely attached and appropriate for your child's age to avoid choking hazards.
Tooth-Shaped Pillow Alternative
Instead of a square pillow with a tooth pocket, you can create a pillow shaped like an actual tooth. This design requires a pattern but creates a more thematic result.
Creating the Tooth Pattern:
Step 1: Draw or print a tooth shape approximately 6 inches tall and 4 inches wide. The shape should be recognizable as a tooth but rounded enough to stuff properly.
Step 2: Cut two pieces from your main fabric and one pocket piece from contrasting fabric.
Step 3: Position the pocket on the back piece—typically in the center of the tooth body, avoiding the root area.
Step 4: Follow the same construction process as the square pillow, paying special attention to curves when sewing. Small, frequent stitches help navigate curved seams smoothly.
Step 5: When turning the pillow right-side out, work carefully around curves to avoid fabric stress. Clip curves if necessary, but not so deeply as to weaken seams.
Tooth-shaped pillows require more skill to construct neatly, but they create an unmistakably themed result. The curved seams provide valuable sewing practice for those looking to advance their skills.
Hanging vs. Under-Pillow Designs
Consider how the tooth fairy will access the pillow when designing your project. Hanging pillows offer easier access and reduce the risk of waking a sleeping child, while traditional under-pillow placement maintains the classic tooth fairy experience.
Adding Hanging Elements:
Ribbon loops, fabric straps, or decorative cords can transform any pillow into a hanging design. Attach these elements securely during construction rather than adding them later for maximum durability.
Consider where the pillow will hang—door knobs, bed posts, or dedicated hooks—and size your hanging elements appropriately. A 6-8 inch loop typically provides adequate length for most hanging locations.
Safety Considerations for Hanging Pillows:
Ensure hanging elements are securely attached and won't create entanglement hazards. Avoid very long cords or ribbons that could pose safety risks, especially for younger children.
Troubleshooting Common DIY Problems
Even experienced crafters encounter challenges when creating tooth fairy pillows. Understanding common issues and their solutions helps ensure project success.
Pocket Placement and Security
Pockets that are too small won't accommodate both tooth and fairy gift, while oversized pockets may not secure items properly. Test your pocket size with actual coins or small gifts before finalizing placement.
If your pocket feels insecure, consider adding a small flap with hook-and-loop tape or a button closure. This prevents items from falling out while still allowing easy access.
Stuffing Distribution
Uneven stuffing creates lumpy, unprofessional-looking pillows. Take time to distribute stuffing evenly, using small amounts at a time rather than large handfuls. Work stuffing into corners and curves with a blunt tool.
Overstuffed pillows become hard and uncomfortable, while understuffed pillows lack shape and durability. Aim for a balance that maintains the pillow's shape while remaining soft enough for comfortable use.
Seam Integrity
Weak seams can fail under normal use, especially at stress points like corners. Backstitch at the beginning and end of all seam lines, and consider reinforcing corners with additional stitching.
If working with stretchy or loosely woven fabrics, stabilize seams with lightweight interfacing to prevent stretching and distortion.
Keep a small repair kit handy for quick fixes. A needle, thread, and small scissors can address minor issues before they become major problems. Teaching children basic repair skills also extends the life of their handmade treasures.

Age-Appropriate Skill Building
Tooth fairy pillow projects can be adapted for different skill levels and ages, making them suitable for family crafting activities.
Ages 4-6: Supervised Assistance
Young children can participate by choosing fabrics, helping with simple cutting (using safety scissors), and adding decorative elements. They can practice threading large needles and making simple stitches under close supervision.
Focus on the creative and decorative aspects rather than precise construction. Let them choose colors, arrange elements, and make design decisions while adults handle sharp tools and complex techniques.
Ages 7-9: Guided Independence
Children in this age range can handle basic hand-sewing with supervision. They can cut simple shapes, sew straight seams, and begin learning proper tool handling.
Start with the no-sew method to build confidence, then progress to hand-sewing techniques. Emphasize safety and proper tool use while encouraging creative expression.
Ages 10+: Independent Projects
Older children can typically handle all aspects of tooth fairy pillow construction, including machine sewing with appropriate supervision. They can plan their own designs, create patterns, and complete projects independently.
This age group often appreciates more sophisticated designs and may enjoy researching different cultural tooth traditions to inspire their creations.
Maintaining and Caring for Handmade Pillows
Proper care ensures your handmade tooth fairy pillow remains functional and attractive throughout its use period, which may span several years as different teeth fall out.
Cleaning Guidelines
Most cotton and felt pillows can be spot-cleaned with mild detergent and water. For more thorough cleaning, hand-washing in cool water with gentle detergent works well for most constructions.
Avoid machine washing unless you're certain all materials and embellishments can withstand the agitation. Machine drying can shrink fabrics and damage decorative elements, so air-drying is typically safer.
Storage Between Uses
Store tooth fairy pillows in clean, dry locations when not in active use. Cedar blocks or lavender sachets can deter insects while adding pleasant fragrance.
If multiple children will use the same pillow over time, consider creating a special storage box or bag to preserve the pillow and maintain its special status.
Repair and Restoration
Minor repairs are often simple to address with basic sewing skills. Keep matching thread and small fabric scraps for patching or reinforcement.
More significant damage may require partial reconstruction, but the skills learned in creating the original pillow make repairs manageable for most crafters.
Handmade items often become cherished keepsakes long after their original purpose is complete. Many families preserve tooth fairy pillows as mementos of childhood milestones. For more guidance on creating lasting memories around tooth loss, explore our comprehensive collection of tooth fairy letter templates and ideas.
Cost Analysis: DIY vs. Store-Bought
Understanding the true cost of DIY projects helps you make informed decisions about your crafting investments.
Material Costs
A basic tooth fairy pillow using the no-sew method typically costs $3-5 in materials, assuming you're purchasing fabric specifically for the project. Using fabric from your existing stash can reduce costs to under $2.
More elaborate designs with special fabrics, embellishments, or embroidery can increase material costs to $8-12, but the customization level far exceeds what's available in commercial products.
Time Investment
Factor in your time when calculating project costs. No-sew versions require 30-45 minutes, hand-sewn pillows take 2-3 hours, and machine-sewn versions need 1-2 hours depending on complexity.
For many crafters, the time investment is part of the project's value, providing relaxation, skill development, and creative satisfaction beyond the finished product.
Long-Term Value
Handmade pillows often outlast commercial versions due to construction quality and the care invested in their creation. The ability to repair and modify DIY pillows extends their useful life significantly.
Additionally, the skills learned in creating one pillow transfer to other sewing projects, making the time investment a learning opportunity rather than just a single-use expenditure.
Complete Your DIY Project with Personalized Tooth Fairy LettersCultural Variations and Global Inspiration
Tooth fairy traditions vary globally, offering inspiration for pillow designs that reflect different cultural approaches to celebrating lost teeth.
In some cultures, mice rather than fairies collect teeth, suggesting mouse-themed pillow designs. Other traditions involve throwing teeth onto rooftops or burying them, which could inspire outdoor-themed or nature-inspired pillow decorations.
For families with multicultural backgrounds, incorporating elements from different traditions can create unique, personally meaningful designs that honor various aspects of their heritage. For more inspiration on global tooth traditions, explore our guide to international tooth fairy customs.

Environmental Considerations
DIY projects offer opportunities to make environmentally conscious choices about materials and construction methods.
Sustainable Fabric Choices
Organic cotton, linen, and hemp fabrics provide eco-friendly alternatives to conventional textiles. These materials often offer superior durability and age gracefully with use.
Repurposing fabric from outgrown clothing, old sheets, or fabric scraps reduces waste while creating unique, meaningful projects. Children often enjoy pillows made from fabric with personal history.
Reducing Plastic Components
Traditional polyester stuffing can be replaced with wool batting, organic cotton batting, or even clean fabric scraps for a completely natural pillow filling.
Natural fiber threads and avoid synthetic embellishments when possible to create pillows that can eventually biodegrade rather than contributing to landfill waste.
Teaching children about sustainable crafting choices helps them develop environmental awareness while creating meaningful projects. These early lessons often influence lifelong decision-making about consumption and waste.
Building Family Traditions Around Handmade Items
Creating tooth fairy pillows can become part of larger family traditions that celebrate milestones and creativity.
Documentation and Memory Keeping
Photograph the creation process and finished products to preserve memories of the crafting experience. Many families create scrapbooks or photo albums dedicated to handmade items and the stories behind them.
Consider writing the date and child's age on a small fabric label to include inside the pillow. This hidden detail becomes a treasure for future discovery.
Skill Progression
Use tooth fairy pillows as stepping stones to more complex sewing projects. Each child's pillow can represent their skill level at the time of creation, showing progression over time if multiple children participate at different ages.
Preserve early projects even if later skills produce more polished results. The progression tells a story about learning and development that has value beyond the finished products.
Intergenerational Crafting
Involve grandparents or other family members in pillow creation to span generations in the crafting process. Older family members may contribute techniques, materials, or stories that enrich the experience.
These collaborative projects often become treasured family memories that extend far beyond the immediate purpose of the finished item.
When DIY Projects Don't Go as Planned
Not every crafting attempt succeeds, and that's a normal part of the learning process. Approaching setbacks constructively turns potential frustrations into valuable learning experiences.
Embracing Imperfection
Handmade items often have character that comes from slight imperfections. Crooked stitches, uneven stuffing, or design elements that didn't go as planned can become charming details that add personality.
Children especially benefit from seeing that imperfection doesn't diminish value. Their tooth fairy will appreciate the effort and love that went into creation regardless of technical perfection.
Learning from Mistakes
Analyze what went wrong in unsuccessful projects to avoid similar issues in future attempts. Common problems like poor pocket placement or inadequate stuffing are easily corrected with experience.
Keep a simple project journal noting what worked well and what you'd do differently. These notes prove invaluable for future projects and help track skill development over time.
Salvaging and Repurposing
Even unsuccessful pillows often contain usable elements. Fabric pieces, partially completed construction, or successful techniques can be incorporated into future projects.
Sometimes the "failed" project becomes a prototype that leads to a much more successful final version. The learning process itself has value even when the immediate result disappoints.
Whether your handmade pillow turns out exactly as planned or becomes a charming learning experience, pairing it with a personalized tooth fairy letter creates a complete magical experience. Our free tooth fairy letter generator helps you create letters that acknowledge your child's growing independence and celebrate milestones like losing teeth and learning new skills.
Conclusion: Creating More Than Just a Pillow
DIY tooth fairy pillows represent much more than functional items for tooth collection. They embody creativity, skill development, family bonding, and the preservation of childhood magic through handmade care.
Whether you choose the simplest no-sew approach or embark on an elaborate themed design, the process of creation adds meaning that no commercial product can match. The time invested, skills learned, and memories made become part of the pillow's value long after the last baby tooth has fallen out.
The techniques learned in creating tooth fairy pillows transfer to countless other sewing projects, making this a gateway craft that can lead to lifelong creative pursuits. For children who participate in the creation process, the experience teaches patience, planning, problem-solving, and the satisfaction of completing meaningful projects with their own hands.
Most importantly, handmade tooth fairy pillows demonstrate love in tangible form. Every stitch, design choice, and finishing touch communicates care and attention that children recognize and treasure. In our increasingly digital world, the physical act of creating something functional and beautiful with our hands carries special significance.
Your child may not remember the exact amount the tooth fairy left, but they'll likely remember the special pillow that made those magical exchanges possible. The pillow becomes part of their childhood story—evidence of a time when adults in their lives took time to create magic through care, creativity, and craft.
Ready to complete your DIY tooth fairy experience? Create personalized letters that make your handmade pillow part of an unforgettable tradition. And when you're ready to extend that personalized magic to birthdays, holidays, and other special moments, The Magic Letter Box provides unlimited custom letters for every childhood milestone.